Tip
TipPicklist values are the list of options in a drop-down list. The Reports Fields page lets you view and manage the picklist values in the Reports module of FASTER Web.
Managing the picklist values include the following:
· Making picklist value obsolete
|
Note: The steps to manage the picklist values are the same for all the picklist fields. The TL User Defined Type picklist field is taken as an example. |
Tip
To view the picklist page of the TL User Defined Type field, click the TL User Defined Type Picklist link.
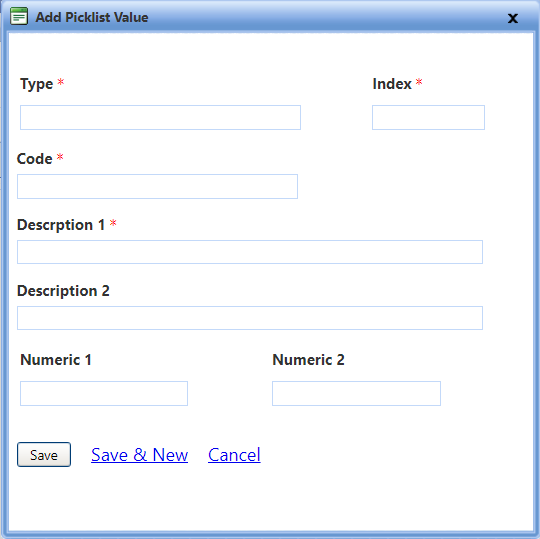
The Add Picklist Value dialog box lets you add values to the picklist fields of the Reports module.
Tip
To view the Add Picklist Value dialog box, click the Add Picklist Value link.
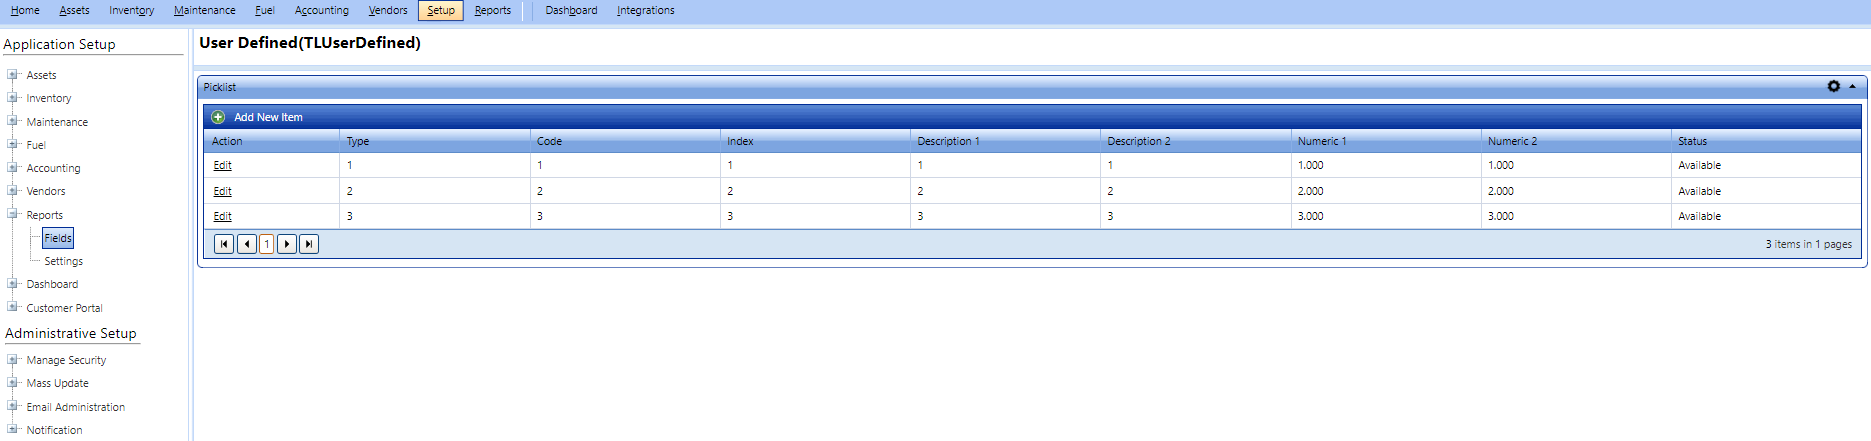
1. Open the Reports Fields page.
2. Click the View link next to the TL User Defined Type field.
The TL User Defined Type Picklist page opens.
3. Click Add New Item.
The Add Picklist Value dialog box opens.
4. In the Type box, type a picklist value.
5. In the Index box, type the index.
6. In the Code box, type the code.
7. In the Description 1 box, type the description of the picklist value.
8. In the Description 2 box, type the description of the picklist value.
9. In the Numeric 1 box, type the numeric value.
10. In the Numeric 2 box, type the numeric value.
11. Click one of the following:
§ Save to save the information and close the dialog box.
§ Save & New to save the information and add another record.
§ Cancel to disregard any changes and close the dialog box.
The Edit Picklist Value dialog box lets you modify the existing values of a picklist field, make the picklist value obsolete, or permanently delete the picklist value from FASTER Web.
Tip
To view the Edit Picklist Value dialog box, click the Edit Picklist Value link.
Open the Reports Fields page.
Click the View link next to the TL User Defined Type field.
The TL User Defined Type page opens.
Click the Edit link next to a value that you want to edit.
The Edit Picklist Value dialog box opens.
In the Type box, type a picklist value.
In the Index box, type the index.
In the Code box, type the code.
In the Description 1 box, type the description of the picklist value.
In the Description 2 box, type the description of the picklist value.
In the Numeric 1 box, type the numeric value.
In the Numeric 2 box, type the numeric value.
Click one of the following:
§ Save to save the information and close the dialog box.
§ Cancel to disregard any changes and close the dialog box.
Make Value Obsolete to hide the picklist value from the Type list.
Delete to permanently delete the picklist value from the Type list.
The Obsolete Picklist Value dialog box lets you hide a picklist value from the list so that it is not used in future transactions.
 Tip
Tip
To view the Obsolete Picklist Value dialog box, click the Obsolete Picklist Value link.
Open the Reports Fields page.
Click the View link next to the TL User Defined Type field.
The TL User Defined Type page opens.
Click the Edit link next to a value that you want to make obsolete.
The Edit Picklist Value dialog box opens.
Click the Make Value Obsolete link.
The Obsolete Picklist Value dialog box opens.
Click one of the following:
§ Yes, Make Value Obsolete to make the value obsolete.
§ Cancel to disregard changes and close the dialog box.
|
Note: After you make a picklist value obsolete, the Edit Picklist Value dialog box displays the Make Value Available link. You can also make the pick list value available in the Type list, as required. To make the pick list value available, click the Make Value Available link, and then click Yes, Make Value Available. |
The Delete Picklist Value dialog box lets you permanently delete a picklist value from a picklist field.
Note: You can permanently delete a picklist value only if it is not previously used in FASTER Web transactions. Optionally, you can hide it from future transactions by making the picklist value obsolete.
Tip
To view the Delete Picklist Value dialog box, click the Delete Picklist Value link.
Open the Reports Fields page.
Click the View link next to the TL User Defined Type field.
The TL User Defined Type page opens.
Click the Edit link next to the value that you want to delete.
The Edit Picklist Value dialog box opens.
Click the Delete link.
The Delete Picklist Value dialog box opens.
Click one of the following:
§ Yes, Delete Value to permanently delete the value from the Type list.
§ Cancel to disregard changes and close the dialog box.