Tip
TipUsing the Import, you can import the details of a Work Order, Direct Charge, Purchase Order, Part Inventory Level as per the selection. The records are imported with files that are exported from the Export Utility in the FASTER Win.
Tip
To view the Import page, click the Import link.
To import the data:
§ Click  next to the Mass Update option, and then click Import.
The Import page opens.
3. In the Module dropdown, select the required module to import. The available modules are All, Direct Charge, Part Inventory Level, Purchase Order, and Work Order.
Note:
An 'Migration Import' permission is to be assigned to the user to have access to the import screen based on the provided serial keys.
4. In the Entity dropdown, select the required entity to import.
§ If the 'All' option is selected in the Module list, the Entity option will be disabled and the 'All' will be selected by default.
§ Based on the module selection the Entity dropdown will have following options:
o Purchase Order: Purchase Order
o Work Order: Work Order Master, Repair, Part Issue, Labor, Sublet, Other Cost, Work Order Note, Downtime
o Direct Charge: Direct Charge Master, Repair, Part Issue, Other Cost
o Part Inventory Level: Part Inventory Level
5. In the Import Mode dropdown, select the required import mode. The following are the two import modes:
§ Standard: In this mode, import framework will be stringent and validates all possible business rules for the given object.
§ Win to Web: In this mode, import framework will bypass business rules for the given object to get it imported into web database. Displays a time zone panel showing import and user time zone. If both are same then you can perform the import activity. Else, the browse button will be disabled and a messaged will be displayed as shown below.

§ When the time zones are different, click the Edit User TimeZone link to update the time zone similar to the Import time zone. The error message will be cleared as shown below.

6. Click the Browse, to select the files(s) to import. Multiple files selection is supported when 'All' is selected in the Entity, so that user can select multiple files per entity. For example, for Work Order Master, user can select single file or multiple files with the same file prefix. For Work Order Master, the file prefix is 'workordermaster'.
Note:
Only files with '.dat' format are allowed.
7. Click the Load & Import File, to load the file(s) browsed and import them. The following processes will be done after clicking on the Load & Import file:
§ The following history entry will be added in the Summary:
o Module, Entity, Start Date.
o End Date will be blank, Total Records, Successful Records, Errored Records, Error File will be blank.
o Status will be 'started'.
§ Will start processing the files in sequence. Files will be identified based on the file naming convention. Import will pick up the files for processing using following naming convention: Will start the processing and at the end of the processing:
o Purchase Order - File having prefix 'purchaseorder'
o Work Order Master - File having prefix 'workordermaster'
o Work Order Repair - File having prefix 'workorderrepair'
o Work Order Part issue - File having prefix 'workorderpartissue'
o Work Order Labor - File having prefix 'workorderlabor'
o Work Order Sublet - File having prefix 'workordersublet'
o Work Order Other Cost - File having prefix 'workorderothercost
o Work Order Note - File having prefix 'workordernote'
o Work Order Downtime - File having prefix 'workorderdowntime'
o Direct Charge Master - File having prefix 'directchargemaster'
o Direct Charge Repair - File having prefix 'directchargerepair'
o Direct Charge Part Issue - File having prefix 'directchargepartissue'
o Direct Charge Other Cost - File having prefix 'directchargeothercost'
o Part Inventory Level - File having prefix 'partinventorylevel'
§ At the end of the processing:
o Generates an error file for failed records, if any.
o Updates the existing records and sets the End Date and Status.
o Displays Download link will be available to download the error file.
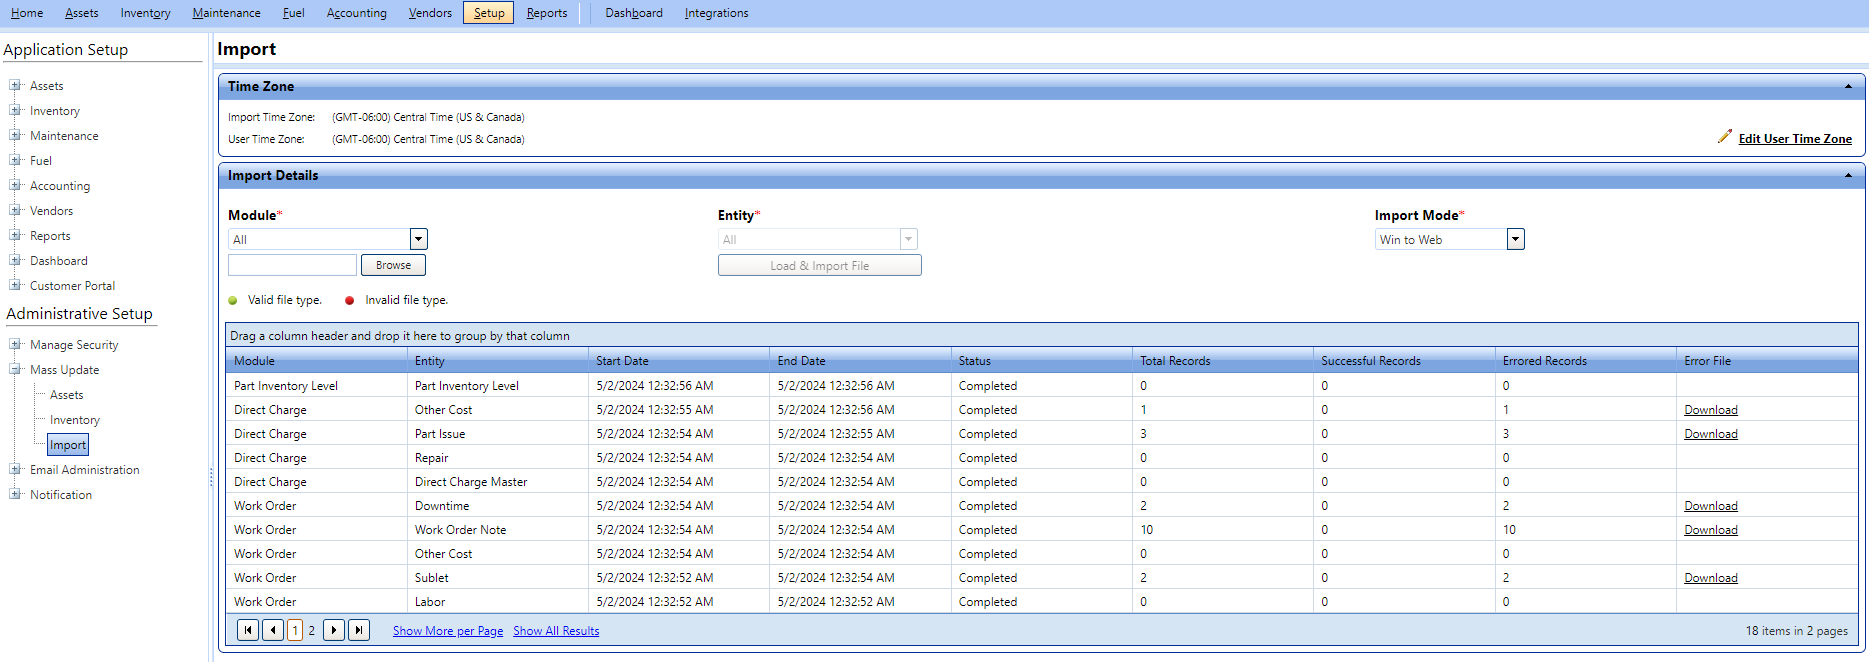
§ The summary of the import processing will be displayed in the grid as shown below:

Note:
The details of the imported file(s) will be displayed after refreshing the page.
o The grid will have the following columns: Module, Entity, Start Date, End Date, Status, Total Records, Successful Records, Errored Records, Error file.
o User can download the error file. This file will have only failed records details.
o If due to data type mismatch, no records are imported, a warning icon will be displayed in the Error file column and hovering over the icon, an error message will be displayed as shown below.

Note:
After importing to the FASTER Web, any user can perform operations on this data.