Authentication Settings
From the Authentication Settings section of the Security Settings page, you can manage the authentication mode for FASTER applications.
The authentication modes are:
There are two authentication flows in FASTER:
-
Non-Authentication Provider Authentication
-
Authentication Provider Authentication
-
Non-Authentication Provider Authentication – In this flow, the Enable Authentication Provider flag in Authentication Settings is set to No.
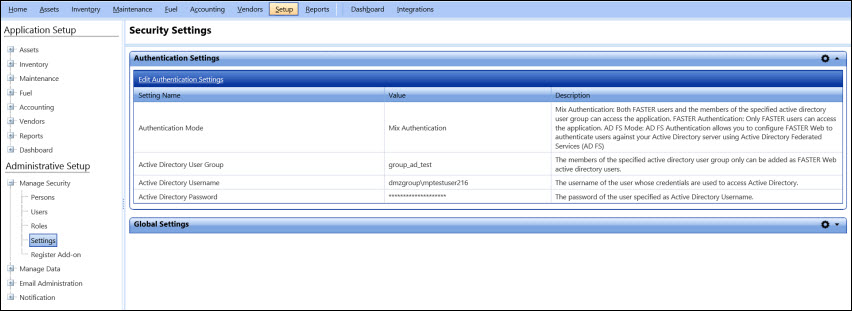
To view the Authentication Settings page for non-Authentication Provider authentication, click the Authentication Settings link.
The authentication modes in this flow are:
-
FASTER authentication
-
Mix Authentication
-
AD FS Authentication
In the FASTER Authentication mode, the users sign in to the FASTER Web application using their credentials created within FASTER Web. These credentials are stored in the FASTER Web database. When a user tries to sign in using these credentials, the credentials are authenticated against the user information available in the FASTER Web database.
In the Mix Authentication mode, the active directory (for example, the Windows Active Directory) is integrated with the FASTER applications hosted in the same domain using Lightweight Directory Access Protocol (LDAP). The users need to sign in to the FASTER applications using their active directory credentials (for example, Windows credentials). In the Mix Authentication mode, users can sign in using their FASTER credentials or with active directory credentials depending on whether the Is Active Directory User check box is selected. Mixed authentication supports a single domain.
Note: The Mix Authentication mode should not be used for Internet-facing hosted environment.
In the AD FS Authentication mode, from the main login page, the AD FS issuer URL redirects AD FS users to Active Directory Federated Services (AD FS) login page. The AD FS login page allows AD FS users to sign in to the FASTER Web applications with same AD FS user credentials. From the main login page, users with FASTER Web credentials are redirected to FASTER Web login page to sign in to FASTER Web applications.
In the AD FS Authentication mode, users can log on to FASTER Web using the following:
Note: This setting requires direct support from FASTER. Please do not configure this option unless you have confirmation form FASTER that all Authentication Provider configuration is complete.
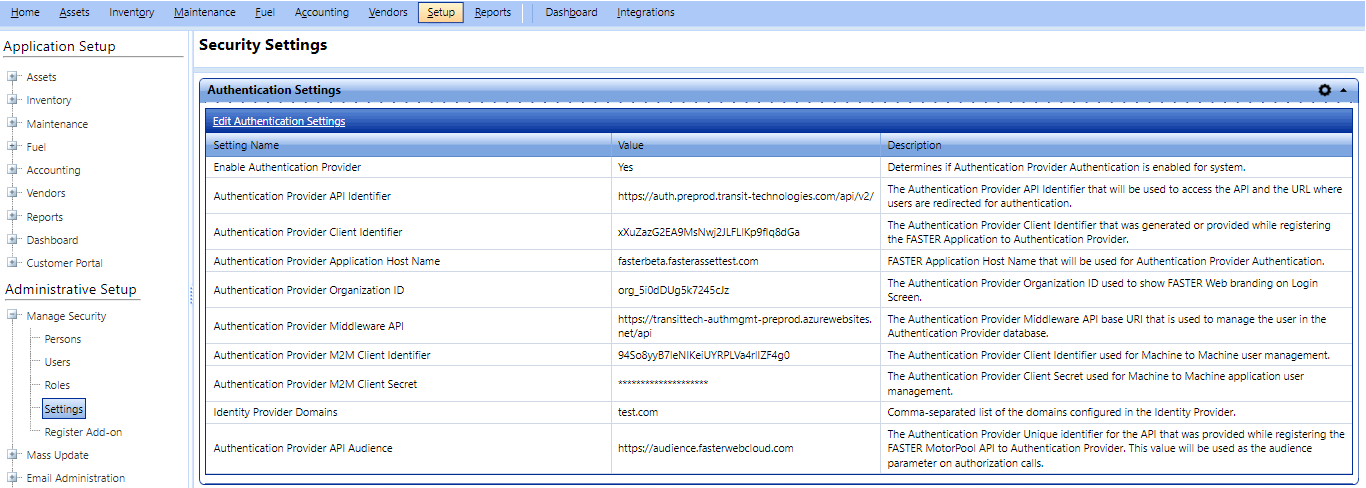
To view the Authentication Settings page when Authentication Provider is enabled, click the Authentication Settings link.
In the Authentication Provider authentication flow, from the main login page, the Authentication Provider issuer URL redirects Authentication Provider users to the Authentication Provider login page. The Authentication Provider login page allows Authentication Provider users to sign in to the FASTER Web applications using the same Authentication Provider user credentials.
Important: The user must log out of the application and reset the IIS of the Application server in the following two scenarios:
-
When user changes the Authentication Mode from AD FS Authentication to Mixed/FASTER Authentication or vice versa
-
When user changes from Authentication Provider login mode to non-Authentication Provider login mode or vice versa
Active Directory
Active Directory is a way of accessing FASTER Web without using the FASTER Web login credentials. That is, you can login with the same credentials used for logging in to your Operating System (For example: Windows login credentials). For FASTER Web to identify your Active Directory credentials, your Active Directory group and Username should be registered in FASTER Web from Authentication Settings.
There are different Active Directory User Groups. For Example: Windows Active Directory User Group. You can add a new user to the FASTER Web from the user groups. The users who are added in FASTER Web can access the FASTER Web application with their Active Directory credentials (for example, Windows credentials).
If you select Mix Authentication mode, an additional Edit Authentication Settings section displays the user account that is used to access the active directory. The following information about the user account is displayed:
-
Active Directory User Group: The members of the specified active directory user group only can be added as FASTER Web active directory users. If a user is member of the active directory but is not a member of the specified user group, the user cannot access FASTER Web application. Also, when you search persons to create a new active directory user or to modify an existing active directory user information, only members of the specified user group are displayed.
-
Active Directory Username (Format: [domain]\[username]): The username of a member of the active directory whose credentials are used to access the active directory. This user is not required to be a member of the user group specified as Active Directory User Group.
-
Active Directory Password (masked characters): The password of the username provided as Active Directory Username. If the password is updated later, the FASTER active directory users will still be able to access FASTER applications; however, new users cannot be created or the active directory user information for existing users cannot be updated.
The advantage of having active directory based access implementation is that the user no longer needs to remember separate credentials to access different FASTER applications. This, in turn, increases convenience and efficiency, while improving access and user adoption.
If the Mix Authentication mode is selected, the following FASTER applications can be configured to use the active directory authentication:
Edit Authentication Settings
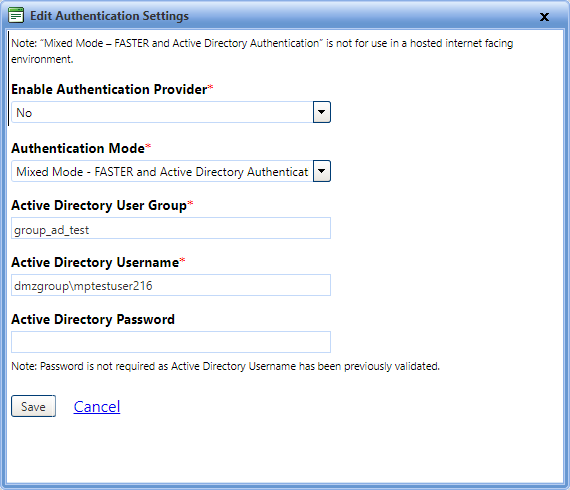
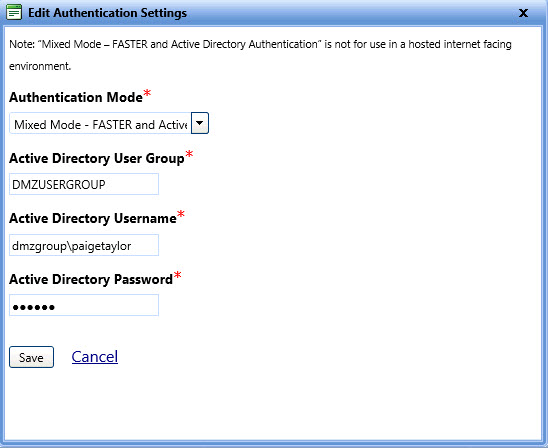
If you select Mix Authentication mode, you need to specify the domain user account that is used to access the active directory. The Edit Authentication Settings dialog box lets you set the domain user account.
 Tip
Tip
To view the Edit Authentication Settings page, click the Edit Authentication Settings link.
To edit the authentication mode
1. Open the Security Settings page.
2. In the Authentication Settings section, click Edit Authentication Settings.
The Edit Authentication Settings dialog box opens.
3. In the Enable Authentication Provider box, select No.
4. In the Authentication Mode list, select the authentication mode you want to configure.
Note: The selected authentication mode is configured for all the applications hosted on the same domain. For example, you have FASTER Web and FASTER Web Customer Portal hosted on the faster.com domain, and the FASTER Technician Work Station hosted on a different domain and the configured authentication mode is Mix Authentication In this case, the FASTER Web and FASTER Web Customer Portal supports both active directory authentication using LDAP as well as FASTER authentication. Whereas, the FASTER Technician Work Station supports only FASTER authentication.
If you select Mix Authentication mode, you must update the active directory user account details.
Do the following:
- In the Active Directory User Group box, type the user group to which the Active Directory belongs.
- In the Active Directory User Name box, type a valid Active Directory user name.
- In the Active Directory Password, type the password.
Note: If the Active Directory user name and password are validated in the first attempt, you can leave the password box blank while modifying other fields. However, if you change the user name, you must provide a password.
5. Click one of the following:
§ Save to save the information and close the dialog box.
§ Cancel to disregard any changes and close the dialog box.
Edit AD FS Authentication Settings
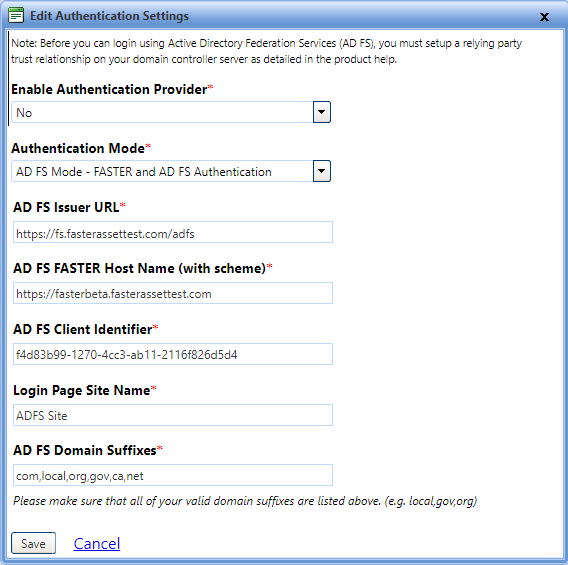
If you select AD FS Authentication mode, you must provide the valid data of AD FS issuer URL and Login page site name to save the AD FS authentication settings. The AD FS issuer URL redirects the users to the AD FS logon page.
 Tip
Tip
To view the Edit AD FS Authentication Settings page, click the Edit AD FS Authentication Settings link.
To edit the AD FS authentication mode
1. Open the Security Settings page.
2. In the Authentication Settings section, click Edit Authentication Settings.
The Edit Authentication Settings dialog box opens.
3. In the Enable Authentication Provider box, select No.
4. In the Authentication Mode list, select AD FS Mode - FASTER and AD FS Authentication.
5. In the AD FS Issuer URL box, type the url of AD FS that is used to redirect users to the AD FS logon page (i.e. https://adfs.yoursite.com/adfs).
6. In the AD FS FASTER Host Name (with scheme) box, type the Host Name that is used for AD FS authentication. For example, https://[yoursite].
7. In the AD FS Client Identifier box, check the value that is generated or provided while registering the FASTER Application to AD FS server Application group. For example, xxxxxxx-xxxx-xxxx-xxxx-xxxxxxxxxxxx.
8. In the Login Page Site Name box, type the name of the customer site. The customer site name is displayed on the main FASTER Web sign in page above the SIGN IN button.
9. In the AD FS Domain Suffixes box, type domain suffixes separated by commas.
10. Click one of the following:
- Save to save the information and close the window.
- Cancel to disregard any changes and close the window.
Edit Authentication Provider Settings
This setting requires direct support from FASTER. Please do not configure this option unless you have confirmation form FASTER that all Authentication Provider configuration is complete.
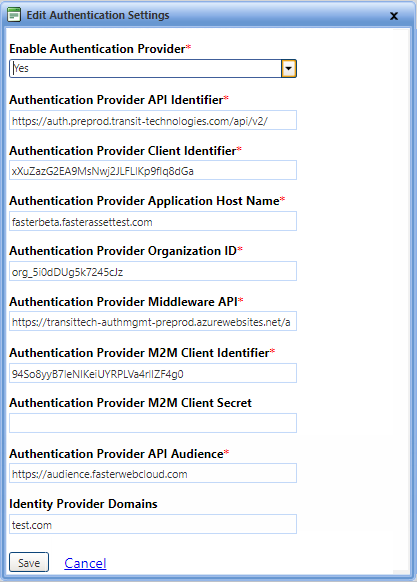
If you select Authentication Provider mode, you must provide the valid data of Authentication Provider issuer URL and Login page site name to save the Authentication Provider authentication settings. The Authentication Provider issuer URL redirects the users to the Authentication Provider logon page.
Note: Any errors that may occur during the configuration phase of the Authentication Provider setup are logged in the W603 report.
 Tip
Tip
To view the Edit Authentication Provider Settings page, click the Edit Authentication Provider Authentication Settings link.
To edit the Authentication Provider authentication mode
1. Open the Security Settings page.
2. In the Authentication Settings section, click Edit Authentication Settings.
The Edit Authentication Settings dialog box opens.
3. In the Enable Authentication Provider box, select Yes.
4. In the Authentication Provider API Identifier box, type the url of the API identifier. For example, https://[yoursite]/api.
5. In the Authentication Provider Client Identifier box, check the value that is generated or provided while registering the Application to Authentication Provider server Application group.
6. In the Authentication Provider Application Host Name box, type the host name of the Authentication Provider application host.
7. In the Authentication Provider Organization ID box, type the organization ID.
8. In the Authentication Provider Middleware API box, type the Authentication Provider Middleware API base URI that is used to manage the user in the Authentication Provider database.
9. In the Authentication Provider M2M Client Identifier box, type the Authentication Provider Client Identifier used for Machine to Machine user management.
10. In the Authentication Provider M2M Client Secret box, type the Authentication Provider Client Secret used for Machine to Machine application user management.
Note: If the Authentication provider M2M Client Secret is validated in the first attempt, you can leave the Authentication provider M2M Client Secret box blank while modifying other fields.
11. In the Authentication Provider API Audience box, type the Authentication Provider Audience details.
12. In the Identity Provider Domains box, type the domain used for Identity Provider.
13. Click one of the following:
- Save to save the information and close the window.
- Cancel to disregard any changes and close the window.
Important: The saved configuration settings must be verified. To do so, have a user other than the admin doing the configuration, log in and ensure the configuration is correct. If it isn’t, then the admin must review the Authentication Provider configuration or turn off the Authentication Provider integration and review the W603 report to check for errors. After the Authentication Provider settings are enabled, please review the Getting Started > Authentication Provider Integration section to understand the login workflow for a new user.
Top of Page
