Tip
TipRepairs are the scheduled or the unscheduled maintenance work performed on an asset. A repair details the reason, schedule, action taken, assigned technician and priority of the repair.
On the Repairs tab, you can view the list of repairs created for a work order. You can also add new repairs, view task list if any created for the repair, delete a repair, and change the existing repairs status.
|
Note: When work order is created on asset which is having pending repair, then pending repair is added automatically as a repair in the work order. |
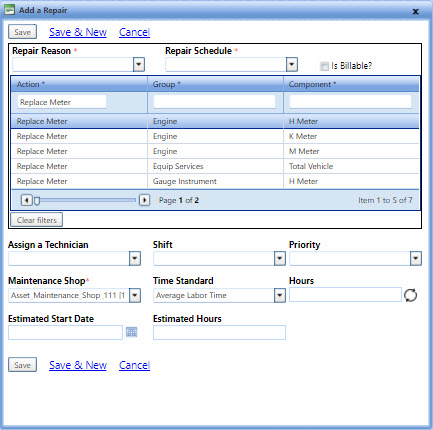
With required permission, you can add a repair to the work order
Tip
To view the Add a Repair dialog box, click the Add Repair link.
1. On the Maintenance module, search and view the work order.
2. Click the Repairs tab.
The Repair List page opens.
3. Click the Add New Repair link.
The Add a Repair dialog box opens.
4. Optionally, in the Maintenance Item Past Due list, select the preventive maintenance that is past due. The Maintenance Item Past Due list is displayed only when the asset has any past due preventative maintenance activity associated to it.
5. Optionally, in the Scheduled Action Past Due list, select the scheduled action that is past due. The Scheduled Action Past Due list is displayed only when the asset has any past due scheduled action associated to it.
6. In the Repair Reason list, select the reason for asset repair.
7. The Repair Schedule list displays schedule assigned to the repair reason by default. Optionally, click to select a different repair schedule.
8. Optionally, select the Is Billable? check box if you want to charge for the repair.
9. Perform the following to select the task to be performed under the repair:
Click the Action search filter to display and select the repair action.
Click the Group search filter to display and select the repair group.
Click the Component search filter to display and select the repair component.
|
Note: · You can click Clear Filters to clear the values selected in the Action, Group, and Component search filters. · To browse through the list, use the arrows at the bottom of the panel. · If a repair code (Action-Group-Component) is not available in the Add a Repair dialog box, with required permission, you can add it from the Setup menu > Maintenance > Repair Codes. |
10. Optionally, in the Assign a Technician list, select a technician to work on the repair.
11. Optionally, in the Shift list, select the shift of the technician to work on the repair.
12. Optionally, in the Priority list, select the level of priority to complete the repair.
13. The Maintenance Shop list displays the default maintenance shop assigned to the asset for repair. Optionally, click the list to select a different maintenance shop.
14. Optionally, in the Time Standard list, select the labor standard value in hours for the repair.
15. Optionally, in the Hours field, type the time required to complete repair. The value in the Hours field is based on the Time Standard selection.
|
Note:
|
16. Optionally, in the Estimated Start Date field, type the start date of the repair in the MM/DD/YY or select the date from the calendar and time from the clock.
17. Optionally, in the Estimated Hours field, type the time required to complete repair.
18. Click one of the following:
o Save to save the information and close the dialog box.
o Save & New to save the information and add another record.
o Cancel to disregard any changes and close the dialog box.
|
Note:
|
A task list created and managed in the Manage Task List section contains instructions for the technicians to work on a repair. A task list created for a specific association type of asset, repair type, and organization gets associated with a repair when a similar repair is added to a work order from the Repairs tab.
Tip
To view the View Task dialog box, click the View Task link.
1. On the Maintenance module, search and view the work order.
2. Click the Repairs tab.
3. Click View Task List next to a repair.
The View Task dialog box opens displaying the following information:
o Tasks listed under the repair
o Instructions to be performed for each task
o Results and comments marked by the technician who worked on the repair from the Technician Workstation (TWS) portal
|
Note: You can click Hide Instructions or Show Instructions to hide or display the Instructions column respectively. |
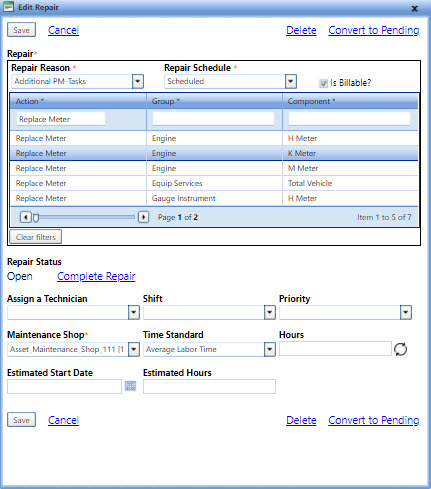
You can edit a repair to modify or update the repair details.
1. On the Maintenance module, search and view the work order.
2. Click the Repairs tab.
3. Click Edit next to the repair you want to edit.
4. In the Edit Repair dialog box, make the changes as desired.
5. Click one of the following:
o Save to save the information and close the dialog box.
o Cancel to disregard any changes and close the dialog box.
|
Note: · In the Edit Repair dialog box, you can click Complete Repair to close an open repair and click Re-Open to start a closed repair. For a meter replacement repair, once you complete the repair, you cannot delete it, and also you cannot reopen it again. · If a technician has started work on a repair from the Technician Workstation (TWS) portal, you cannot mark the repair as complete in FASTER Web. A warning message notifying that the technicians are currently logged into this repair and that you need to log off and try again is displayed. The technician must close or complete the repair from the Technician Workstation (TWS) to complete the repair in FASTER Web. |
You can change the status of a newly added repair to Pending if you do not want to complete the repair in the current work order. When you create a new work order for the asset, the pending repairs of the asset automatically adds to the new work order.
1. On the Maintenance module, search and view the work order.
2. Click the Repairs tab.
3. Click the Edit link next to the repair.
4. In the Edit Repair dialog box, click the Pending link.
5. In the Pending Repair dialog box, click one of the following:
o Yes, Change this repair to Pending to change the repair status to Pending.
o No, Cancel to close the dialog box.
A repair can be deleted only if it is just created and not yet picked up by a technician in the Technician Workstation (TWS). The technician must first mark the repair as Closed in the Technician Workstation (TWS) portal to delete the repair in FASTER Web.
1. On the Maintenance module, search and view the work order.
2. Click the Repairs tab.
3. Click Edit next to the repair you want to delete.
4. In the Edit Repair dialog box, click Delete.
5. In the Delete Repair dialog box, click one of the following:
o Yes, Delete Repair to confirm the deletion.
o Cancel to close the dialog box.
You can add a repair note for any special needs or attention to be taken on the repair as a reminder.
|
Note: · When you change the repair status of an asset to Pending, the pending repair along with the repair note automatically adds to any new work order created for that asset. · The notes for a pending repair display the service request comment provided by the Customer Portal user. |
The Add Repair Note dialog box opens.
3. In the Subject and the Repair Note boxes, type the subject and the details of the note, respectively.
Required fields are marked with a red *.
4. When finished, click one of the following:
o Save to save the information and close the dialog box.
o Save & New to save the information and add another record.
o Cancel to disregard any changes and close the dialog box.
|
Note: After you add a note to a repair, the notes |
You can add a repair for meter replacement. You can also edit and delete the repair, but cannot reopen it.
For more information, refer to Managing Meter Replacement Repair.


 icon is displayed in the