Filling Reports Information
From the Step 2: Fill Reports Information page, you can provide report information such as report display name can hide reports or make them visible in the Reports module.
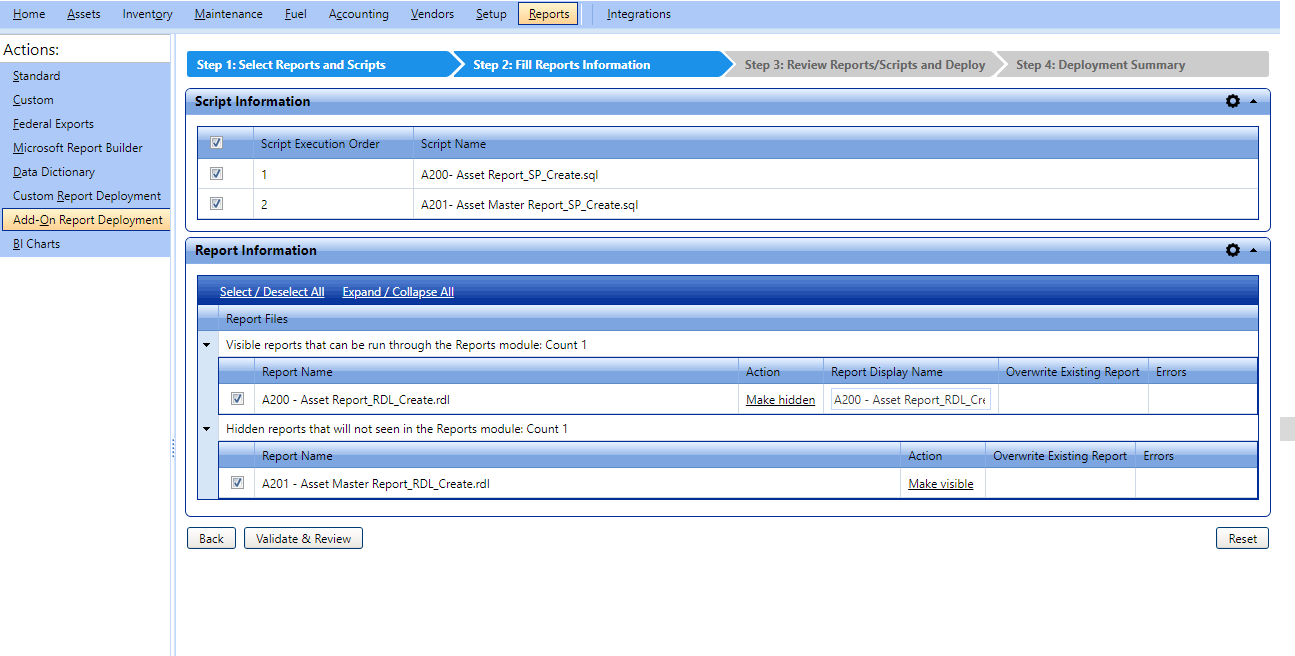
The Script Information section and the Report Information section display the script files (.sql), and the report files (.rdl) that are selected in the Step 1: Select Reports and Scripts page.
 Tip
Tip
- To view the Fill Reports Information page for the Hosted centrally on FASTER Web application server hosting scenario, click the Fill Reports Information link.
- To view the Fill Reports Information page for the Installed on individual client machines hosting scenario, click the Fill Reports Information link.
To fill the reports information page
1. In the Fill Reports Information page, do the following to select either scripts, reports or both, as required:
§ In the Script Information section, select the scripts that you want to execute on the FASTER Web database.
Note: The Script Information section displays all the scripts that you have selected in the Step 1: Select Reports and Scripts page.
- In the Report Information section, select the reports that you want to deploy on the Report server.
|
Note:
-
In the Report Information section, the system automatically segregates the reports in the Visible reports section and Hidden reports section.
-
If you want a report to be visible in the Reports module, in the Action column, click the Make visible link next to the appropriate report.
-
If you do not want a report to be visible in the Reports module, in the Action column, click the Make hidden link next to the appropriate report.
|
2. In the Report Display Name box, type the name of the report to be displayed in the Reports module.
3. Reports are deployed under Add-On Reports folder on the report server. In the Reports module, reports are displayed under the Add-On Reports.
Note: The Report Display Name field display the display name of the selected report if you have selected Reports.xml in the Step 1: Select Reports and Scripts page when Microsoft Report Builder is installed on individual client machine.
4. Click the Validate & Review button to validate the selected reports. System validates whether each report exist on the report server based on Report Display Name. If a report with the same Report Display Name exists in the Add-On Reports folder, an error message is displayed in the Errors column of the respective report.
|
Note:
-
If a report exists in the Add-On Report folder on the Report server, the Overwrite Existing Report column displays the following two options:
- Yes - Select Yes, if you want to override the existing report server’s report with the selected report.
-
No - Select No, if you do not want to override the report server’s report.
-
When the reports are not available in the Add-On Report folder on the report server, the Overwrite Existing Report column displays N/A.
-
To go back to the Step 1: Select Report and Scripts page, click the Back button.
-
To undo the changes that you made after navigating from the Step 1: Select Report and Scripts page to the Step 2: Fill Reports Information page, click the Reset button. The page is then reloaded to its first time state.
|
Top of Page