For the MotorPool Reservation Import for Billing utility to successfully fetch and read the CSV file from the specified path to import reservation data and to create reservations with Closed reservation status, you must set the configuration values. After validating the records, the processed file is renamed and moved to the specified archive folder path.
Configuration setup dialog box
1. Sign in to the FASTER Web with a valid User name and Password.
2. Click the Integrations module.
The Integrations Console page opens.
3. In the Reservation Import for Billing integration, click the Setup link.
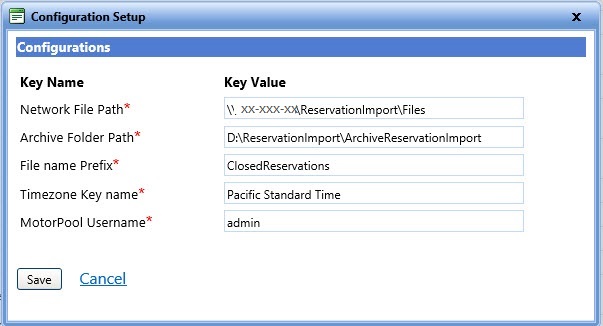
The Configuration Setup dialog box opens.
4. In the Network File Path box, type the location of the folder where the import files are located.
5. In the Archive Folder Path box, type the path where you want the Reservation Import for Billing utility to create a Archive folder. For example, to create a Archive folder on the application server, specify the path as D:\Integration\RIB\ and to create a Archive folder on a shared network path, specify the path as \\IP Address of machine\Integration\RIB\.
Note: If you create a folder on the network path, the path contains IP address followed by the folder name. For example, \\xxx.xx.xx.xxx\Reservation Import\. The Network Service must have permission to access the shared folder.
6. In the File name Prefix box, type the prefix that you want to add for the filename.
The Reservation Import for Billing utility looks for the files with this filename prefix at the import location.
7. In the Timezone Key name box, type the timezone that is used to offset datetime structure within the import file.
8. In the MotorPool Username box, type the MotorPool admin username to authenticate the import process.
|
Note: User should have the following permissions in MotorPool Operations to create a closed batch reservation:
|
9. Click one of the following: