 Tip
TipThe Inventory module of FASTER Web maintains inventory of parts, fluids, and fuel items such as diesel, ethanol, and propane. The following sections guide you through the recommended ways of configuring and dispensing fuel inventory items in FASTER Web. There are different ways of configuring fuel inventory for different scenarios. You can choose the way from the following sections that best suit your fleet operations.
You can configure the inventory settings with required Inventory module permissions for the Storerooms (fuel sites) that are assigned to your user account.
This topic includes: Hide
It is recommended that you setup each fuel site as an individual Storeroom. This lets you separate permissions on the Storeroom (fuel site) among users, and report the inventory items associated with the storeroom more easily.
|
Scenario |
Recommendation |
Reason for Recommendation |
|
You have a single fuel inventory site/ location. |
Setup a single Storeroom. |
A single storeroom is sufficient for a single fuel inventory site/ location. Note: If you need to preform fuel transfers between different fuel tanks such as a mobile tank to another tank, you must set up multiple storerooms. |
|
You have multiple fuel inventory site/ location. |
Setup different Storerooms for different fuel site/ locations. |
You can list all the fuel tanks and locations based on the Storeroom, and also create separate permissions for each Storeroom. |
|
You have a mobile tank and need to track transfers between one mobile tank and another one. |
Setup a Storeroom for each fuel tank. |
For example: if you have two mobile trucks that need to transfer fuel from a fuel site and/or between the trucks themselves, you must setup a Storeroom for each mobile truck. In each Storeroom, add an inventory item for the fuel in the truck itself. |
After you setup Storerooms, add appropriate inventory items to the Storeroom. The following table provides guidelines on determining the number of items to be added in each Storeroom.
|
Scenario |
Recommendation |
Reason for Recommendation |
|
You have one tank for a specific Fuel Type at a Fuel Site. |
Create a single Item Number for that Fuel Type. |
A single Item Number is sufficient as there is only one tank for the specific Fuel Type in a Fuel Site. |
|
You have multiple tanks for the same Fuel Type at a single Fuel Site. |
Create separate Item Numbers for each tank. |
You can track the fuel quantity in each tank. |
|
You need to transfer fuel from one tank to another such as a mobile tank. |
Add an item for each tank. |
The Inventory Transfer feature allows you to transfer fuel between two items in different storerooms. Therefore, set up different Storerooms for each fuel tank so that you can transfer fuel between tanks in different Storerooms. Note: If you do not have the need to transfer fuel from one tank to another, you can set up a single Storeroom for all the tanks. |
This section explains the recommended way to configure the fuel inventory items in the storeroom. After you create storeroom (s) for your fuel inventory, you must add fuel items to inventory.
Tip
To view the Add New Item dialog box, click the Add New Item link.
Note: To add fuel items to inventory, the required Storeroom, Item Type, Stock Type, Unit of Issue, and Item Category must exist in FASTER Web. To add them, go to Setup > Application Setup > Inventory > Fields. In the Inventory Fields page, View the required picklist field and add the picklist value.
1. Open the Add New Item dialog box.
2. In the Item Number box, type one of the following:
§ When you maintain a single storeroom to stock all the fuel items, it is recommended to have fuel type as the item number. For example, Diesel, Unleaded, Propane.
§ When you maintain multiple storerooms, it is recommended that the item number includes fuel type, fuel site number, and tank number.
For example:
The Item Number must be Diesel-41 where:
o Fuel type is Diesel
o Fuel site number is 4
o Fuel tank number is 1
The Item Number must be Unleaded-41 where:
o Fuel type is Unleaded
o Fuel site number is 4
o Fuel tank number is 1
3. In the Storeroom list, select the storeroom that you created for this fuel item.
4. In the Item Name box, type a name that includes information about fuel type, fuel site, and fuel tank in the same sequence.
For example:
The Item Name is Diesel – Site-4 – Tank-1 where:
§ Fuel type is Diesel
§ Fuel site is Site-4
§ Fuel tank is Tank-1
Item Name is Unleaded – Site-4 – Tank-1 where:
§ Fuel type is Unleaded
§ Fuel site is Site-4
§ Fuel tank is Tank-1
5. In the Item Type list, select Fuel.
6. In the Stock Type list, select Stock.
When the stock type of the item is set to Stock, the Inventory > Ordering > Stock Order section indicates reordering an item when the available quantity of fuel is less than or equal to the stock reorder point. You can also use the Auto Order option if you want the Stock Order tab to display the reorder required for the item.
7. In the Unit of Order list, select gallons or liter.
8. In the Unit of Issue list, select gallons or liter.
9. In the Unit Multiplier list, type the amount by which you want to multiply the item ordered.
To add optional information
§ In the Item Category list, select 044 Fuel System.
§ In the Default Vendor list, select a default vendor that supplies the fuel item.
§ In the Item Description box, type the information about the fuel type, fuel site, and the number of dispensers available in the respective fuel site. Example, Diesel – Site-4 includes 4-Dispensers.
§ In the Bin Location box, type the location of the item in the storeroom. Include the fuel tank and fuel site information as item location name. Example, Tank 1 Site 4.
§ In the Alternate Location box, type the alternate location of the fuel in the storeroom.
§ In the Available field of the Item Usage section, select the type of usage of the item.
§ Click Add.
The usage of the item is selected and is displayed in the Selected section.
10. Click one of the following:
§ Save to save the information and close the dialog box.
§ Save & New to save the information and add another record.
§ Cancel to disregard any changes and close the dialog box.
You can set the inventory markup based on whether you want to issue fuel to a work order or dispense fuel through the Fuel module. If you choose to issue fuel to a work order, the Inventory Markup is applied. If you choose to dispense fuel through the Fuel module, Fuel Markup is applied.
Inventory markup is calculated on the basis of markup associated with Item Number attached with the Fuel Type. Markup is on the basis of By Storeroom or By Item. For more information, see Price and Warranty > Price Settings.
You can dispense fuel from Inventory via the Fuel module. Both the COTS Fuel Import and manual transactions allow fuel dispensing. It is required to map each inventory item that you want to dispense, with a Fuel Site and Dispenser. Following are the instructions to map an inventory item with a fuel site and dispenser. After mapping is completed, dispensing through the COTS Fuel Import requires the Fuel Site and Dispensing add on to the COTS Fuel Import.
After you create Fuel Inventory Items, go to the Setup module > Application Setup > Fuel > Settings > Fuel Vendor Mapping and associate an inventory item to each fuel site and dispenser from which you want to dispense fuel. This association enables FASTER Web to draw quantity from the appropriate Storeroom when the fuel item is dispensed from the Fuel module and when fuel transactions are imported to FASTER Web. For more information, see Internal Fuel System and Commercial Card Mapping.
· Use the Inventory > Ordering section to place fuel order.
Note: Before placing a fuel order, go to the Vendors module, view each of your fuel vendor and in the Master tab > Edit Identification > Edit Vendor dialog box, ensure that the Vendor Category section has the Inventory option selected.
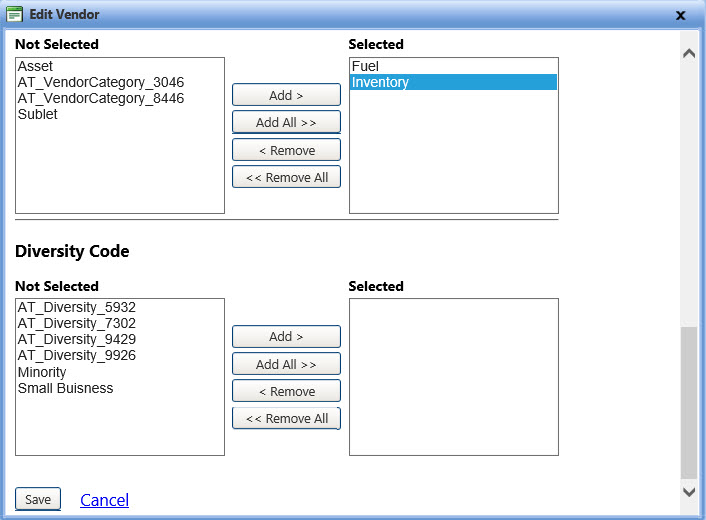
Edit vendor dialog box
· Use the standard Purchase Orders and/or Credit Cards as payment methods while Ordering fuel.
These Purchase Order and/or Credit Card details are tied to the Expense Account to keep you in line with the fuel budget.
· Use the Inventory > Receiving section to receive fuel.
The received fuel is added to your inventory.
|
Note: · The Fuel Inventory Costing method (Moving average or FIFO) is inherited from the Inventory module. · When you import the fuel transactions from the Fuel module, the fuel cost is either included in the import file or is taken from the Fuel Cost Setup configured in the Setup module. This is based on the Cost Identifier setting configured in the Fuel Import Setup dialog box during fuel import. The Fuel Cost is taken from the import file if the Cost Identifier is set to Total Cost or Unit Cost, and the Fuel Cost is taken from the Fuel Cost Setup if the Cost Identifier is set to No Cost. · The Merge Inventory Items feature is disabled for any Inventory Item that is mapped to a Fuel Site and Dispenser. |
The Inventory > Perform Inventory section lets you adjust the quantity of items in a storeroom. You can use the standard inventory tools to find out the fuel quantity in a storeroom, and in case of variance in the quantity of fuel, adjust the existing quantity with the new quantity.
If the inventory counts that you enter does not match the current inventory count, you must select a reason for adjustment in the Reason for Adjustment list.
It is recommended that you select one of the following reasons for adjustment:
· Stick Reading
· Fuel Inventory Adjustment
For these reasons to be available in the Reason for Adjustment list, you must add these reasons in the Setup > Application Setup > Inventory > Fields. In the Inventory Fields page, View the Reason for Adjustment option. Click the Add Picklist Value link and add the Stick Reading and Fuel Inventory Adjustment as pick list values. For more information on adding a pick list value, see Managing Values in Inventory Picklist.

