When a utility imports data to the FASTER Web database, you can view the integration log details from one of the following ways:
· Integration Console page > Integration Logs window
· Reports module > Standard Reports > Setup > W604 -Integration Log Viewer Report
· Reports module > Standard Reports > Setup > W603 - Message Logger
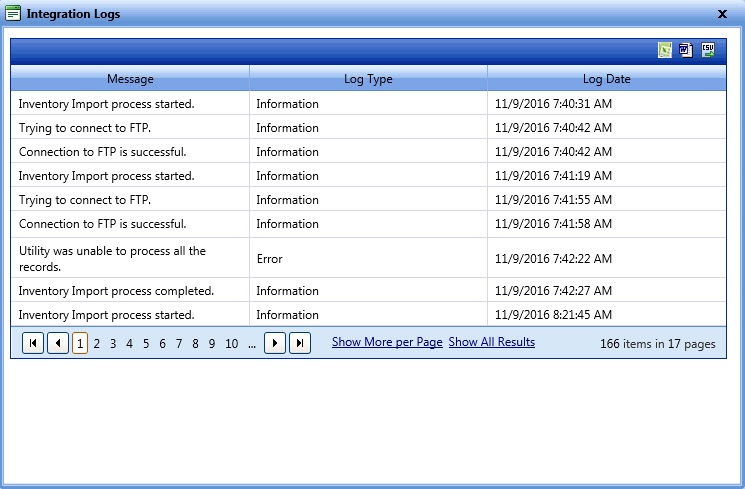
The Integration Logs window displays the integration status of the items import using the Inventory Import Utility.

Integration logs
The Integrations Console page opens.
The Integration Logs window displays the import status.
The W604 - Integration Log Viewer report provides detailed information about record-wise integration status of the integration, and execution summary of the integration for the selected date range. This report provides Integration details that include Message ID, Timestamp, Transaction Data, Log Level (debug/info/warning/error), and Message.
You can view integrations log from the Reports module > Standard Reports > Setup > W604 -Integration Log Viewer Report.

W604 - Integration Log Viewer report fields
1. Click the Reports module.
The Standard reports page opens.
2. In the Setup section, click W604 - Integration Log Viewer.
The W604 - Integration Log Viewer report page opens.
3. In the Time Zone list, select the appropriate time zone to view the integration logs.
4. In the Integration Name list, select Inventory Import Utility.
5. In the Start Date field, pick a start date to define the beginning of date range for integration logs.
6. In the End Date field, pick an end date to define the end of date range for integration logs.
7. In the Display Exception Details list, select Yes to view the complete record details with summary or No to view only the summary.
8. Click View Report.
The report details are displayed.
9. Page through the document using the controls in the upper left. 
10. Search by a keyword using the Find/Next box at the top of the screen. 
11. To update the information on the page, click the Refresh button at the top right of the screen. 
The W603 - Message Logger report provides detailed information about record-wise integration status of the integration, and exception details for the selected date range. This report provides Integration details that include Message ID, Timestamp, Transaction Data, Log Level (debug/info/warning/error), and Error Message.
You can view application log and integrations log from the Reports module > Standard Reports > Setup > W603 - Message Logger report.

W603 - Message Logger report fields
1. Click the Reports module.
The Standard reports page opens.
2. In the Setup section, click W603 - Message Logger.
The W603 - Message Logger report page opens.
3. In the Time Zone list, select the appropriate time zone to view the integration logs.
4. In the Message Type list, select the message type to view the details.
5. In the Start Date field, pick a start date to define the beginning of date range for integration logs.
6. In the End Date field, pick an end date to define the end of date range for integration logs.
7. In the Display Exception Details list, select Yes or No.
§ Yes, displays exception details in the report.
§ No, does not display exception details in the report.
8. In the Application Type list, select the type of application to view the application logs.
9. Click View Report.
The report details are displayed.
10. Page through the document using the controls in the upper left. 
11. Search by a keyword using the Find/Next box at the top of the screen. 
12. To update the information on the page, click the Refresh button at the top right of the screen. 
Click  to schedule the report.
Click  to print the report in a PDF format.
Click  to print the report.
Steps to export a report to another program
1. Click the Export button. 
2. Select the appropriate format.
This generates a File dialogue box specific to your computer.